Introduction to my HomeLab
Introduction
I have set out to explain to the world how I built my homelab, the services I have deployed, the role of each one, and the adjustments and configurations I have made. I also intend to be consistent with my posts (I will try to publish one per week).
I have decided to split all the work I’ve done into blocks, to avoid making the posts excessively long:
- Introduction to my HomeLab - Startup and First Steps
- Network Block I - Domains
- Network Block II - Services
- Management Block I - Administration
- Management Block II - Monitoring
- Services Block
- Tweaks, Backups, and Extras
Links will appear as I publish the posts.
A Little Theory
Before starting to build the homelab, I think it’s good to clarify some theory to understand a bit of what we will be talking about here, as well as the programs, applications, and services used.
But before that, What is a homelab?. Well, it is a computer laboratory environment that is built at home to host self-hosted services and experiment with technology, networks, and cybersecurity. It allows you to learn, improve professional skills, and run personal projects risk-free, using anything from old laptops or Raspberry Pis to professional rack servers.
With this definition, and as you will see, it is clear that super-powerful systems are not needed to have a proper infrastructure ready to deploy several useful services.
The Network
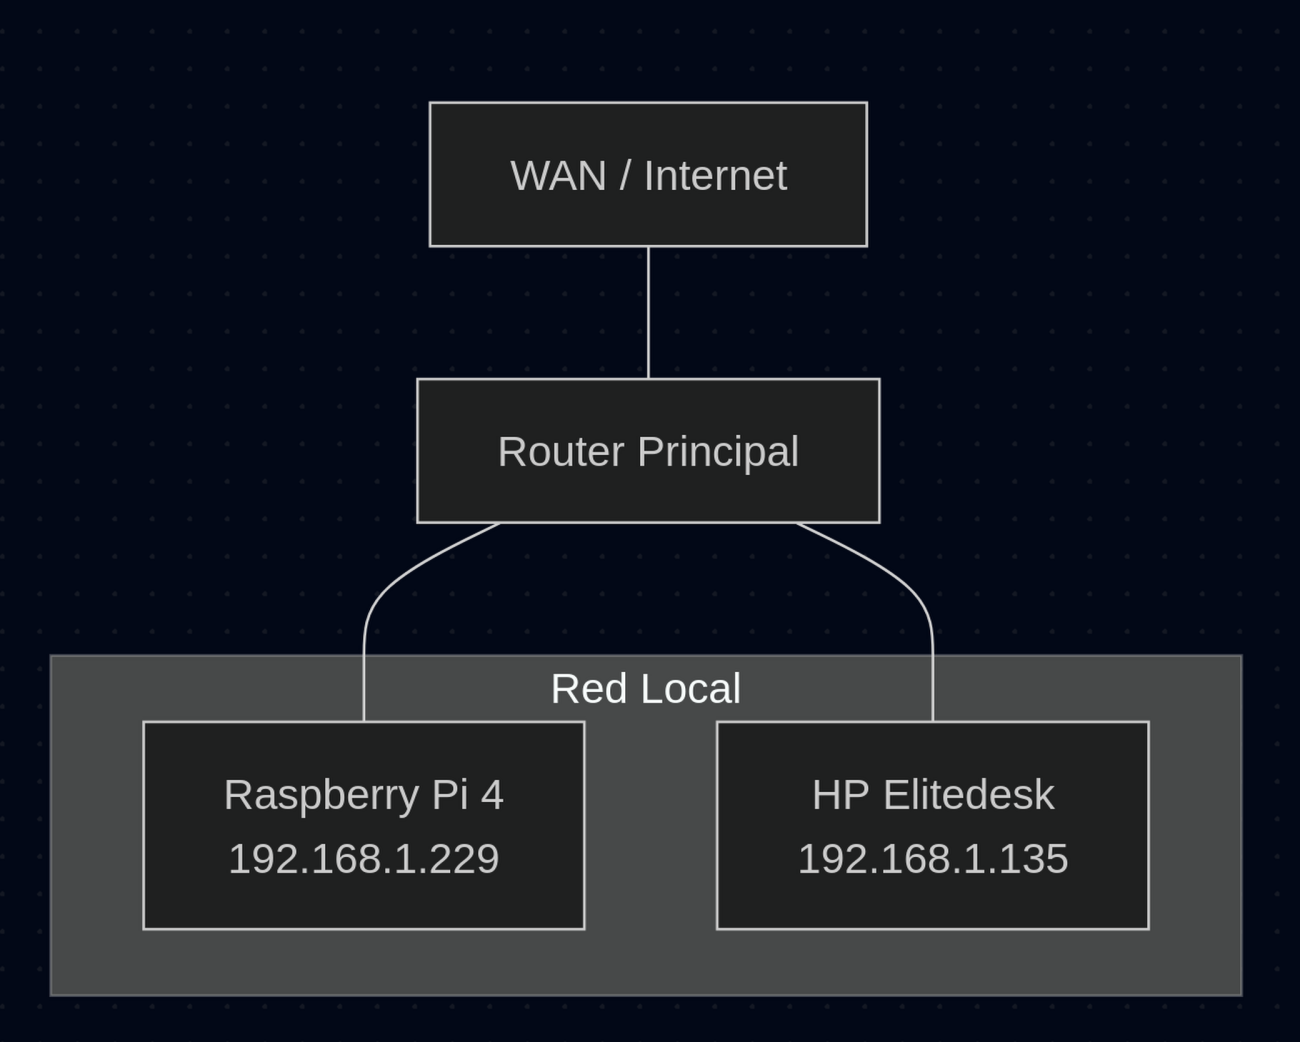
The network is simple; do not expect a 24-port 1Gb Aruba switch or a cheap 6-port TP-Link switch. There are only two servers, so they go directly to the router using CAT.7 ethernet cable. The topology is simple: the router also acts as a switch and manages the connections between the devices, straight and simple. Since I know you like images, here is one:
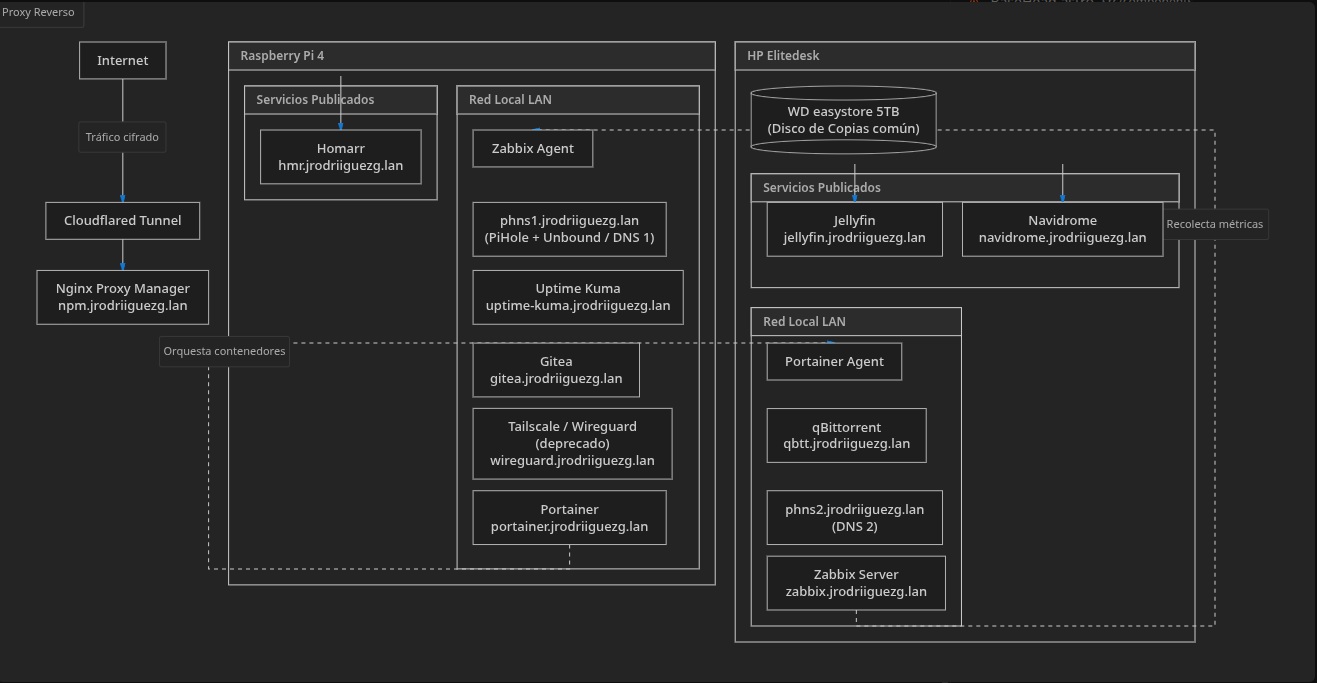
On a logical level it is a bit more chaotic, but I won’t stop to explain everything right now because we will see that step by step. For now, I’ll just show you the logical diagram:
The Hardware
Well, as you will see, the hardware used is quite modest. Although at the time of writing this post I already have two machines, when I started the homelab I only had a humble Raspberry Pi 4B with 4GB of RAM (it’s humble but it holds its ground). This Raspberry Pi is still part of the infrastructure and hosts the most critical services. Later, I bought an HP Elitedesk 705 G3 via Wallapop, which honestly was a very good upgrade for the 60 euros it cost. Below, I detail the specifications of each of these machines:
Raspberry Pi 4B
The Raspberry Pi is quite well known by computer enthusiasts, electronics hobbyists, and anyone with geeky interests and curiosity for doing projects, but if you happen to be reading this and have no idea what it is, let me put it in context: The Raspberry Pi is a single-board computer (SBC) of a fairly small size (like a credit card). It mounts an ARM processor like the ones in mobile phones, which allows it to consume very little power and not require active cooling. A board like this has many uses: some use it as a mini PC, others use it for electronics and computing projects.
In my case, I have had the 4GB Pi 4B for several years. I’ve done everything with it and installed everything on it, and here it is still fighting. Its specs are:
- CPU: Broadcom BCM2711 4 x 1.50GHz
- GPU: VideoCore VI 500MHz
- RAM: 4GB LPDDR4-3200
- Connectivity: 2.4/5 GHz Wifi, Bluetooth 5.0, and 1Gb Ethernet
- Storage: User-dependent, I have a 64GB Lexar MicroSD card in it

For the operating system, I am using RaspberryPiOS Lite, which is based on Debian 12 Bookworm. You will see that for server topics, I always use and will use Debian, since it is the most stable in the long run and has the best community support (you will never see me using Ubuntu).
The configuration was simple: using the Raspberry Pi Imager tool, I flashed the RaspberryPiOS image onto the SD card and configured SSH on boot. The rest was just plugging it into power, connecting it to the network, and that’s it. Everything else is done via SSH.
HP Elitedesk 705 G3
I acquired this machine a few months ago, as I wanted to expand the services I had and the Raspberry Pi was on the verge of shutting down forever. I got this computer on Wallapop for about 60 euros, and I upgraded it with some parts I had. I will list the current specs, not the ones it had when it arrived:
- CPU: AMD PRO A10-8770E 4 x 3.08GHz
- GPU: AMD Radeon R7
- RAM: 16GB DDR4-SODIMM
- Connectivity: Qualcomm Atheros QCA9377 + BCM5762 1Gb
- Storage: Kingston 128GB SSD (OS)
- Movies: WD Blue 1TB NVMe
- Backups: WD easystore 5TB
- Music: Aliexpress Generic 512GB NVMe
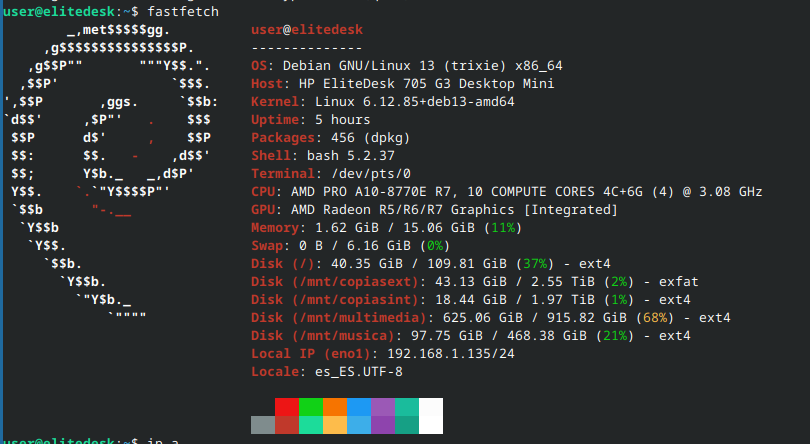
Regarding the operating system, I already gave a hint in the previous image, but we are running Debian again. I’ve already said I wouldn’t use anything else. Here, the deployment was a bit different since I had to install it physically and then enable SSH.
The Base of Both
As I’ve already mentioned, at the core we have Debian. At the OS level, the only packages installed are:
tailscaledockervsftpdkpatchnfs-commonandnfs-kernel-serverneedrestartrsynczstd
At the operating system level, there is only that in both of them (well, and fastfetch to generate the image). All services have been deployed using Docker containers, using the official installer:
curl -fsSL https://get.docker.com -o get-docker.sh
sudo sh get-docker.sh
Once Docker is installed, everything else is deployed using docker-compose.
The Image
I couldn’t end this entry without showing a picture of the super infrastructure. This image is missing the 5TB hard drive as it is a recent acquisition.
.png)
Comments
Giscus Comments setup pending
To enable Giscus comments, please enable GitHub Discussions in your repository and set the Category ID in src/consts.ts.